> ## Documentation Index
> Fetch the complete documentation index at: https://docs.gomaestro.org/llms.txt
> Use this file to discover all available pages before exploring further.
# Integrating Maestro Event Manager into Your Application
This guide for understanding the [Event Manager](https://docs.gomaestro.org/event-manager) can be viewed in conjunction with our [Bitcoin Wallet Insight Demo](https://github.com/maestro-org/maestro-replit-templates/tree/main/maestro-wallet-demo) - an example Bitcoin application showcasing the Wallet API and Event Manager capabilities for wallet insights and state monitoring.
You can deploy [this demo](https://replit.com/@roethke/Maestro-Replit-Templates?v=1) to see the Event Manager in action, as well as how it is integrated, before implementing it in your own application to:
1. Set up automated monitoring for Bitcoin wallet activities, transactions, and blockchain events
2. Create triggers that fire when specific conditions are met (e.g., large transactions, new inscriptions)
3. Receive real-time notifications via webhooks to keep your application responsive
## Overview
The [Event Manager](https://docs.gomaestro.org/event-manager) is a powerful service that allows you to monitor Bitcoin blockchain events and receive notifications when specific conditions are met. Unlike user-facing features, the Event Manager is designed as an **admin-only service** that operates behind the scenes to keep your application informed of important blockchain activities.
Key benefits:
* **Real-time monitoring** of wallet addresses, transactions, and blockchain state
* **Automated notifications** via webhooks when triggers activate
* **Flexible trigger conditions** for various blockchain events
***
## Architecture Overview
```mermaid theme={null}
graph TB
A[Your Application] --> B[Maestro Dashboard]
B --> C[Event Manager API]
C --> D[Bitcoin Blockchain]
C --> E[Webhook Endpoint]
E --> F[Application Backend]
F --> G[User Notifications]
F --> H[Database Updates]
F --> I[Business Logic]
style B fill:#ff9999
style C fill:#99ccff
style E fill:#99ff99
```
**Flow Explanation:**
1. **Admin creates triggers** via the [Maestro Dashboard](https://docs.gomaestro.org/event-manager#set-up-an-event-manager)
2. **Event Manager monitors** the blockchain for specified conditions
3. **Webhooks fire** when conditions are met, sending data to your application
4. **Your application processes** the webhook and takes appropriate actions
***
## Prerequisites
* **Node.js** ≥16 and **npm** (or Yarn) installed
* A Maestro [API key](https://dashboard.gomaestro.org/login) with Event Manager access
* An existing application (we'll use our [maestro-replit-templates](https://github.com/maestro-org/maestro-replit-templates) wallet demo as an example)
***
## Complete Event Manager Operations
### Configure and Manage Event Triggers in the Maestro Dashboard
The [Maestro Dashboard](https://docs.gomaestro.org/event-manager#set-up-an-event-manager) provides a user-friendly interface for managing Event Manager operations. Follow these steps to set up monitoring for your Bitcoin applications:
#### Step 1: Access the Event Manager Dashboard
1. **Log in** to your [Maestro Dashboard](https://dashboard.gomaestro.org/login)
2. **Navigate** to the *Events* tab in the top navbar
3. **Create** a new Webhook
 #### Step 2: Create Your First Webhook
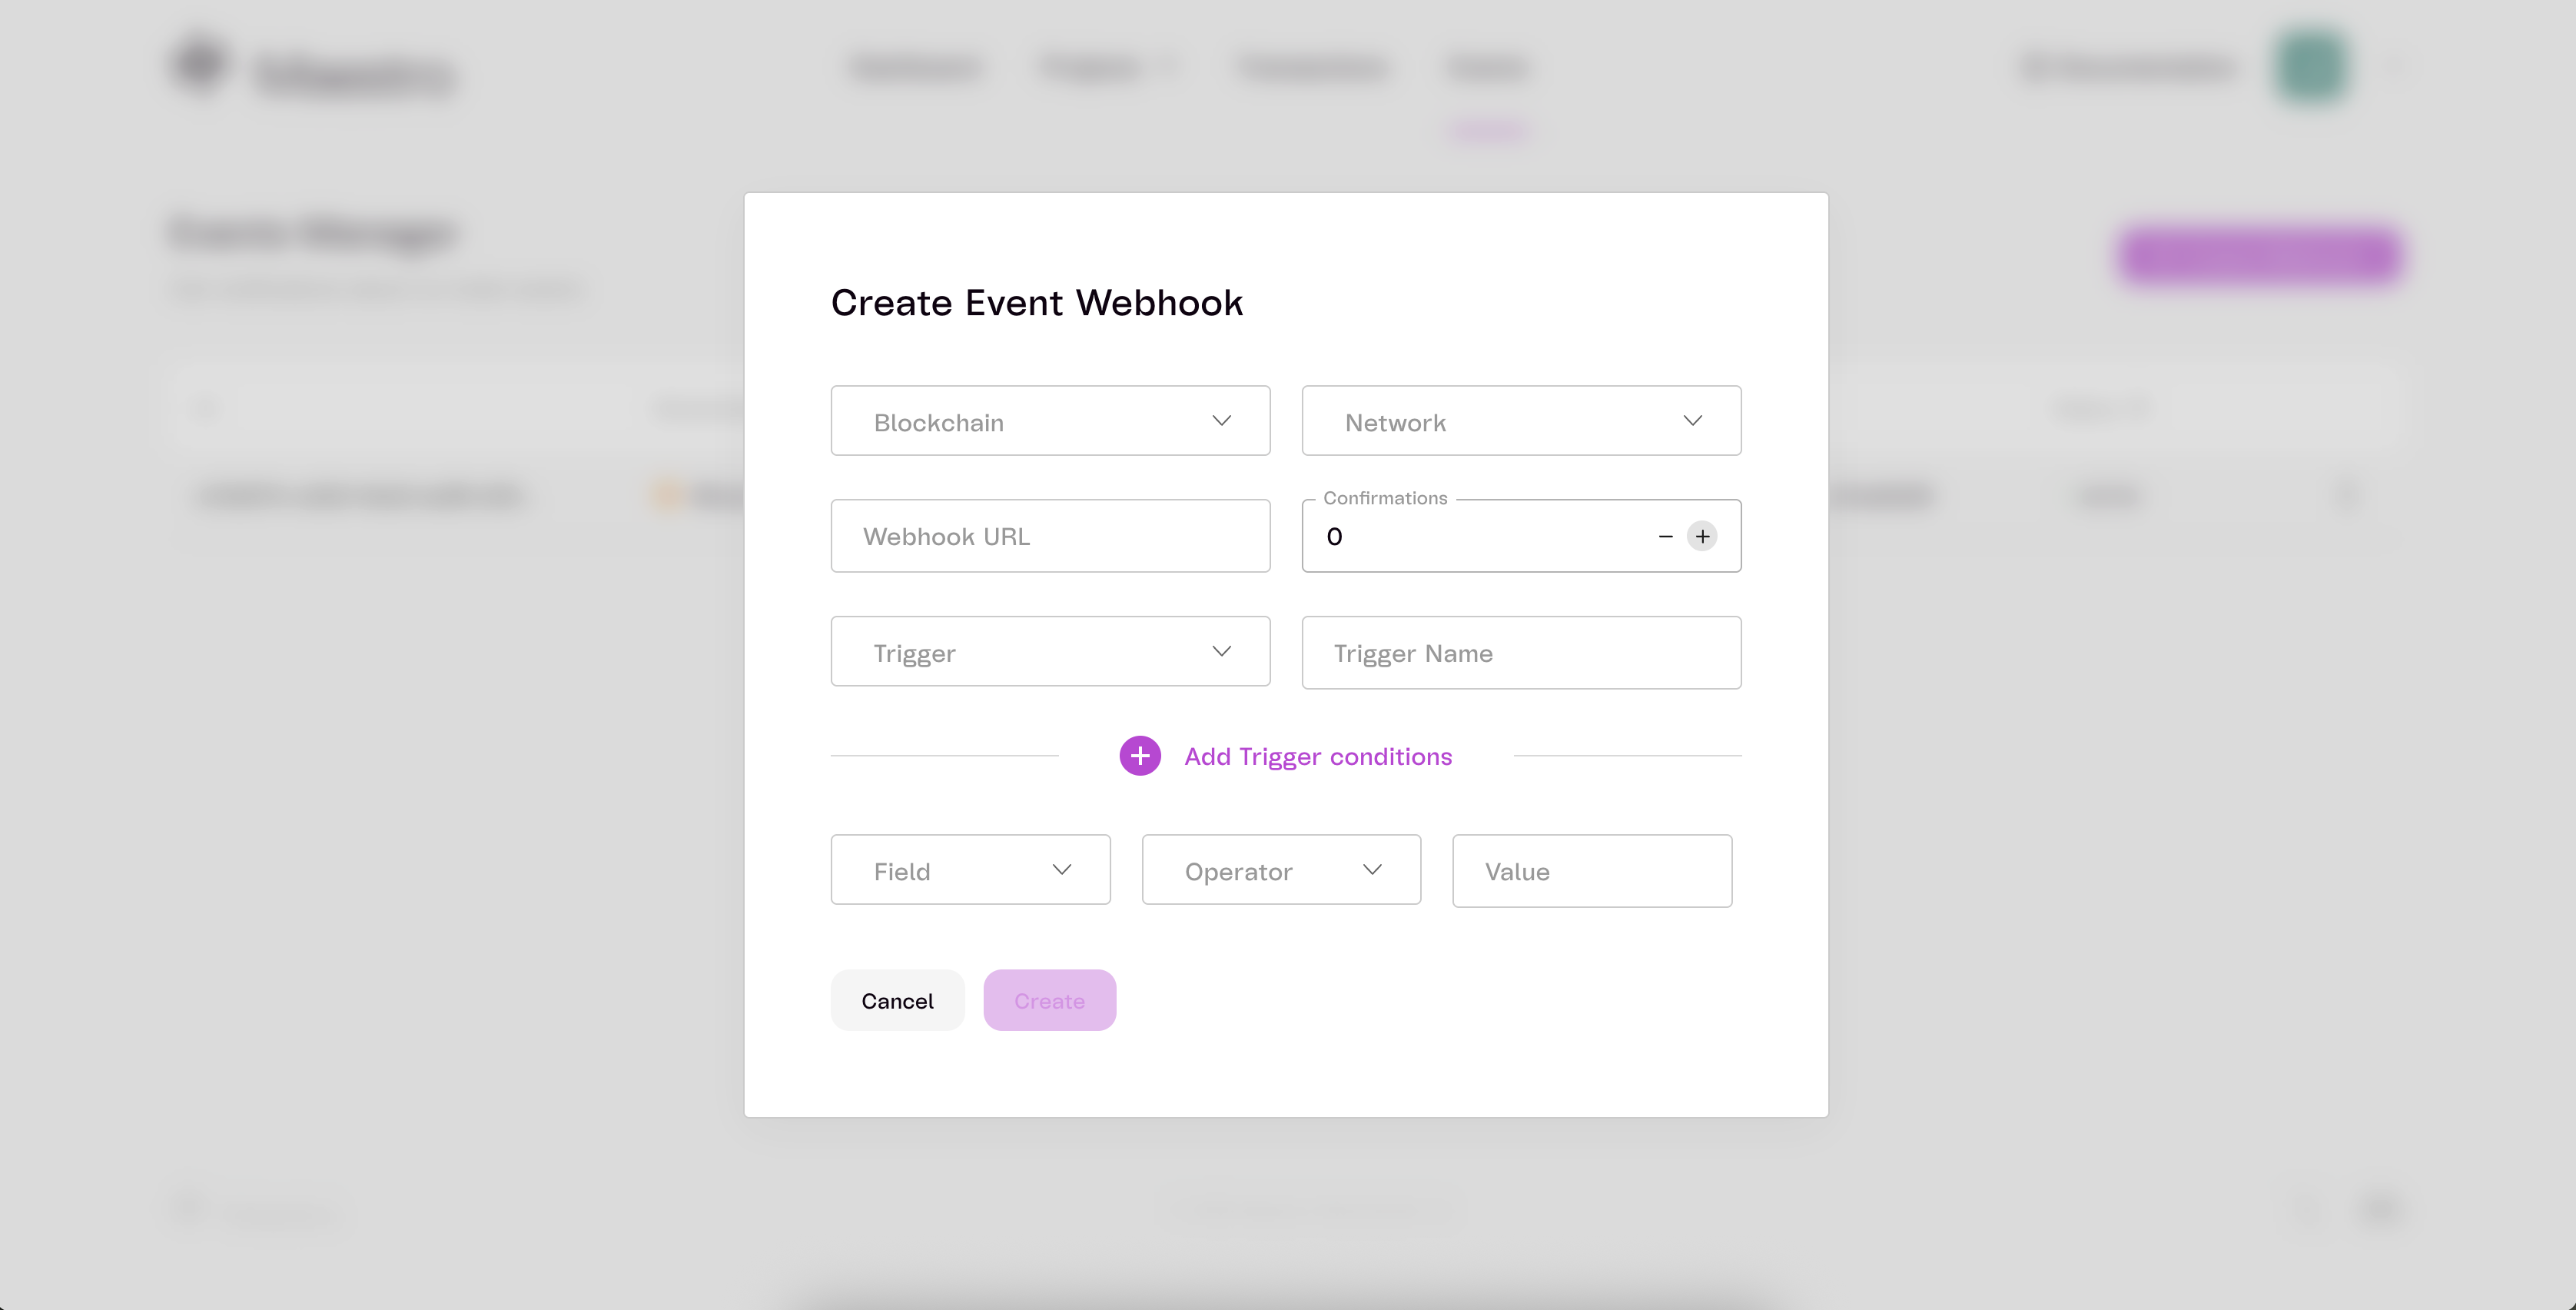
1. **Click "Create Webhook"** to open the event webhook creation wizard
2. **Configure basic settings:**
* **Chain**: Select "Bitcoin"
* **Network**: Choose "Mainnet" or "Testnet"
* **Webhook URL**: Enter your application's webhook endpoint
* **Set confirmation requirements**: Choose 1-6 confirmations based on your security needs
* **Trigger Type**: Select "Transaction" for monitoring Bitcoin transactions
* **Trigger Name**: Give it a descriptive name (e.g., "Wallet Balance Monitor")
#### Step 2: Create Your First Webhook
1. **Click "Create Webhook"** to open the event webhook creation wizard
2. **Configure basic settings:**
* **Chain**: Select "Bitcoin"
* **Network**: Choose "Mainnet" or "Testnet"
* **Webhook URL**: Enter your application's webhook endpoint
* **Set confirmation requirements**: Choose 1-6 confirmations based on your security needs
* **Trigger Type**: Select "Transaction" for monitoring Bitcoin transactions
* **Trigger Name**: Give it a descriptive name (e.g., "Wallet Balance Monitor")
 **Testing tip**: Use [webhook.site](https://webhook.site) to generate a test URL for initial setup
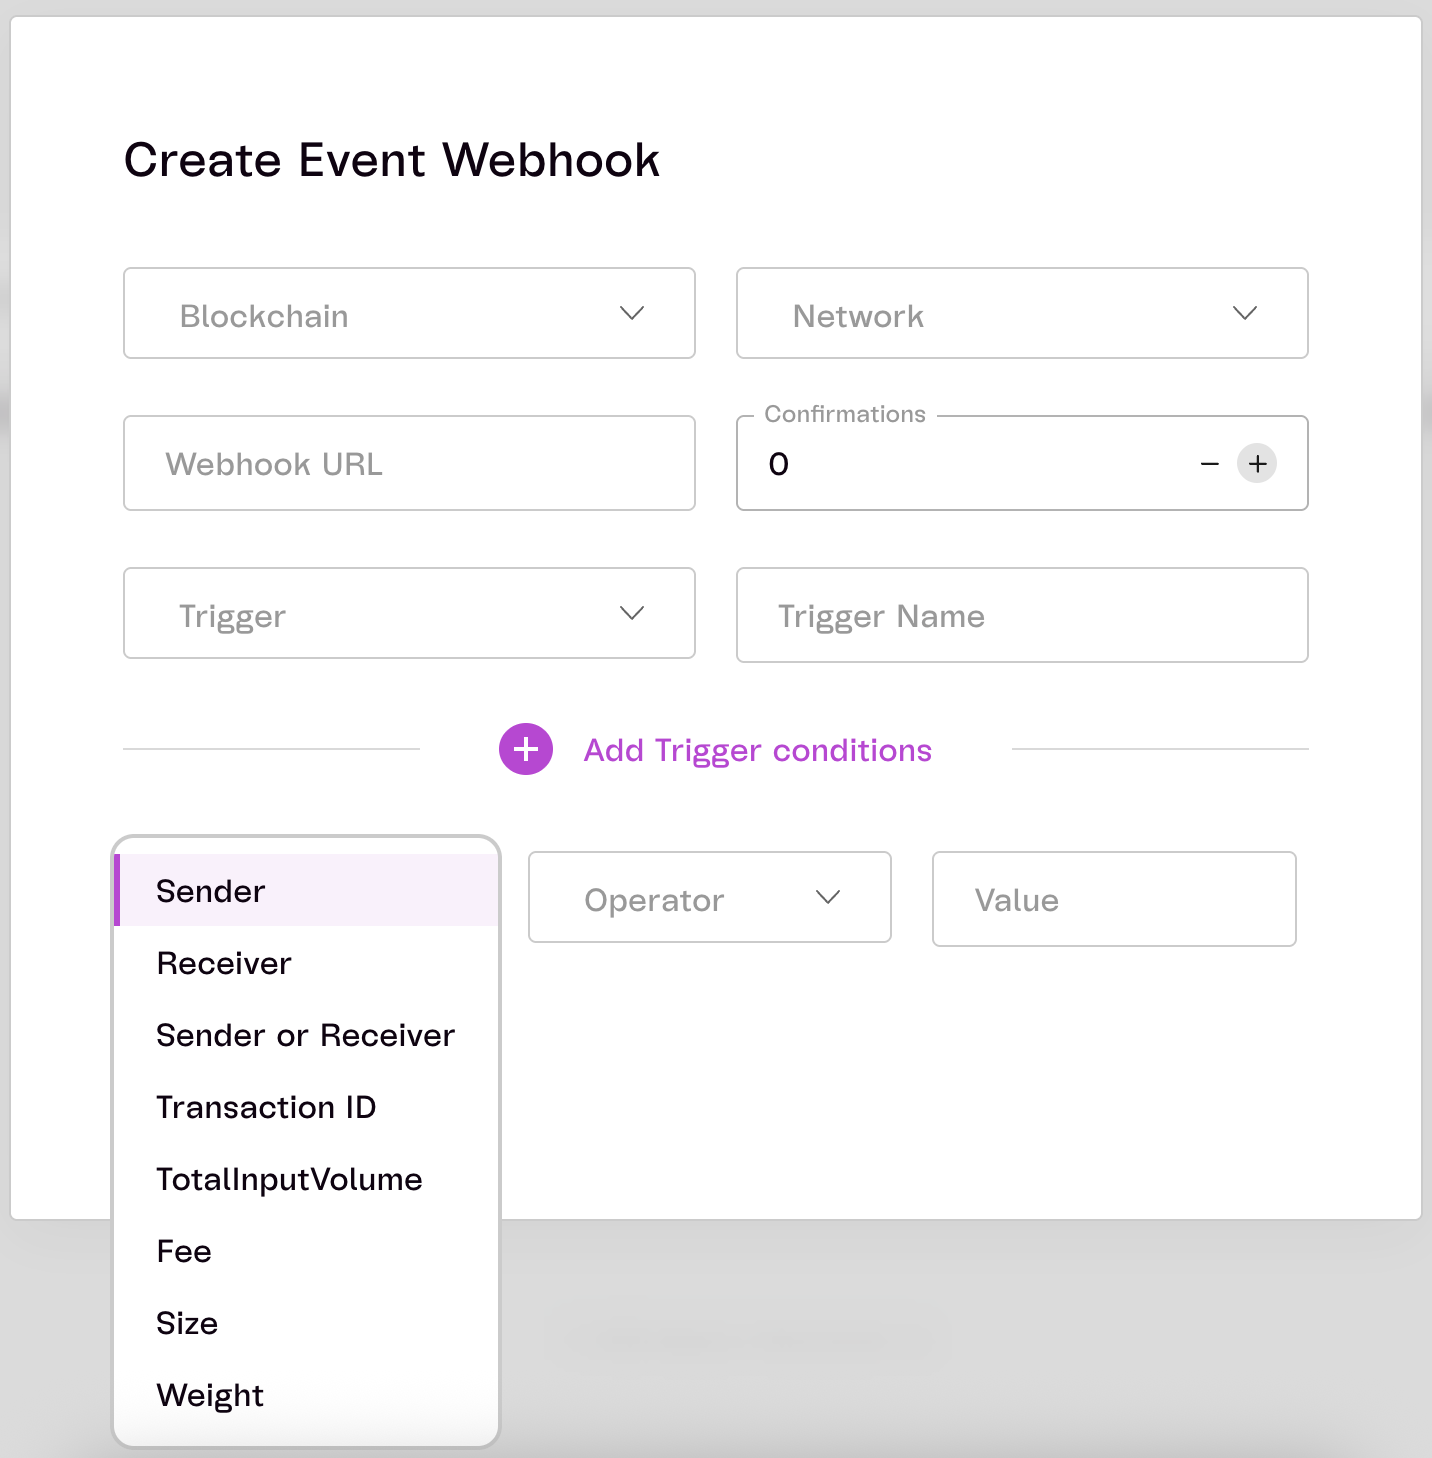
4. **Configure trigger conditions** using the filter builder:
* **For wallet monitoring**: Set filter key to "Sender or Receiver" with your Bitcoin address
* **For large transactions**: Set "TotalInputVolume" with operator ">" and value in satoshis
* **For specific addresses**: Use "Sender" or "Receiver" filters as needed
**Testing tip**: Use [webhook.site](https://webhook.site) to generate a test URL for initial setup
4. **Configure trigger conditions** using the filter builder:
* **For wallet monitoring**: Set filter key to "Sender or Receiver" with your Bitcoin address
* **For large transactions**: Set "TotalInputVolume" with operator ">" and value in satoshis
* **For specific addresses**: Use "Sender" or "Receiver" filters as needed
 6. **Click "Create"** to activate monitoring
#### Step 3: Test Your Webhook
1. **Send a test transaction** that matches your trigger conditions
2. **Monitor the Event Logs** to see triggered events in real-time
3. **Check your webhook endpoint** to verify you're receiving notifications
4. **Review the payload structure** to understand the data format for your application
#### Step 4: Manage Active Webhooks
1. **View all webhooks** in the dashboard with status indicators (Active/Paused)
2. **Monitor webhook statistics** including event count and last triggered time
3. **Pause/Resume webhooks** as needed for maintenance or testing
4. **Edit webhook settings** to modify filters, webhook URLs, or confirmation requirements
5. **Delete unused webhooks** to stay within your account limits and keep things organized
#### Step 5: Monitor Event Logs
1. **Filter logs** by trigger, date range, or status for easier debugging
2. **Inspect event details** including the full transaction payload and webhook response
3. **Troubleshoot webhook issues** by checking response status codes and error messages
4. **Export logs** for analysis or compliance reporting if needed
*If you'd prefer to manage webhooks/logs programmatically, the [Event Manager API](https://docs.gomaestro.org/bitcoin/event-manager-api/overview) provides comprehensive functionality for this. Available operations shown below.*
**Pro Tips for Dashboard Usage:**
* Start with testnet webhooks to familiarize yourself with the interface
* Use descriptive trigger names that indicate their purpose
* Set up multiple webhooks with different confirmation levels for different use cases
* Regularly review and clean up unused webhooks to optimize performance
### Trigger Management
The following snippets are borrowed from the [Bitcoin Wallet Insight Demo](https://github.com/maestro-org/maestro-replit-templates/tree/main/maestro-wallet-demo).
#### 1. Creating Triggers
Create triggers to monitor Bitcoin transactions based on specific conditions:
```typescript theme={null}
const eventManager = new EventManagerApi('mainnet', 'your-api-key');
const triggerConfig: CreateTriggerRequest = {
name: "High Value Transaction Monitor",
chain: "bitcoin",
network: "mainnet",
type: "transaction",
webhook_url: "https://your-app.com/webhook",
filters: [
{
key: "total_input_volume",
operator: ">",
value: "1000000000" // 10 BTC in satoshis
}
],
confirmations: 6
};
const newTrigger = await eventManager.createTrigger(triggerConfig);
console.log('Created trigger:', newTrigger.id);
```
#### 2. Listing All Triggers
Retrieve all your active triggers:
```typescript theme={null}
const triggers = await eventManager.listTriggers();
triggers.forEach(trigger => {
console.log(`${trigger.name} (${trigger.id}): ${trigger.status}`);
console.log(`Events triggered: ${trigger.event_count}`);
});
```
#### 3. Getting Trigger Details
Fetch detailed information about a specific trigger:
```typescript theme={null}
const triggerId = "your-trigger-id";
const trigger = await eventManager.getTrigger(triggerId);
console.log('Trigger details:', trigger);
```
#### 4. Updating Triggers
Modify existing triggers (name, filters, status, etc.):
```typescript theme={null}
const updates: UpdateTriggerRequest = {
name: "Updated High Value Monitor",
chain: "bitcoin",
network: "mainnet",
type: "transaction",
webhook_url: "https://your-app.com/webhook",
status: "paused", // or "active"
filters: [
{
key: "total_input_volume",
operator: ">",
value: "2000000000" // 20 BTC in satoshis
}
],
confirmations: 6
};
const updatedTrigger = await eventManager.updateTrigger(triggerId, updates);
console.log('Updated trigger:', updatedTrigger);
```
#### 5. Deleting Triggers
Remove triggers that are no longer needed:
```typescript theme={null}
await eventManager.deleteTrigger(triggerId);
console.log('Trigger deleted successfully');
```
### Filter Options
Available filter keys include:
* **sender**: Monitor transactions from specific addresses (operator: `=`)
* **receiver**: Monitor transactions to specific addresses (operator: `=`)
* **sender\_or\_receiver**: Monitor transactions involving specific addresses (operator: `=`)
* **transaction\_id**: Monitor specific transaction IDs (operator: `=`)
* **total\_input\_volume**: Monitor by transaction value (operators: `=`, `>`, `>=`, `<`, `<=`)
* **fee**: Monitor by transaction fee (operators: `=`, `>`, `>=`, `<`, `<=`)
* **size**: Monitor by transaction size in bytes (operators: `=`, `>`, `>=`, `<`, `<=`)
* **weight**: Monitor by transaction weight (operators: `=`, `>`, `>=`, `<`, `<=`)
### Event Log Management
#### 6. Listing Event Logs
View logs of triggered events with optional filtering:
```typescript theme={null}
// List all logs with pagination
const logs = await eventManager.listEventLogs({
page: 1,
limit: 50
});
// Filter logs by trigger
const triggerLogs = await eventManager.listEventLogs({
trigger_id: "your-trigger-id",
page: 1,
limit: 20
});
// Filter by chain and network
const mainnetLogs = await eventManager.listEventLogs({
chain: "bitcoin",
network: "mainnet",
page: 1,
limit: 25
});
logs.forEach(log => {
console.log(`Log ${log.id}: Status ${log.status}`);
console.log(`Response: ${log.response_status} - ${log.response}`);
});
```
#### 7. Getting Specific Event Logs
Retrieve detailed information about a specific event log:
```typescript theme={null}
const logId = "your-log-id";
const eventLog = await eventManager.getEventLog(logId);
console.log('Event log details:', {
id: eventLog.id,
trigger_id: eventLog.trigger_id,
status: eventLog.status,
response_status: eventLog.response_status,
payload: eventLog.payload
});
```
### Advanced Filter Examples
Here are practical examples of different filter configurations:
```typescript theme={null}
// Monitor large transactions (>= 1 BTC)
const largeTransactionTrigger: CreateTriggerRequest = {
name: "Large Transaction Monitor",
chain: "bitcoin",
network: "mainnet",
type: "transaction",
webhook_url: "https://your-app.com/webhook/large-tx",
filters: [{
key: "total_input_volume",
operator: ">=",
value: "100000000" // 1 BTC in satoshis
}],
confirmations: 3
};
// Monitor specific wallet address
const walletMonitor: CreateTriggerRequest = {
name: "Wallet Activity Monitor",
chain: "bitcoin",
network: "mainnet",
type: "transaction",
webhook_url: "https://your-app.com/webhook/wallet",
filters: [{
key: "sender_or_receiver",
operator: "=",
value: "bc1qxy2kgdygjrsqtzq2n0yrf2493p83kkfjhx0wlh"
}],
confirmations: 1
};
// Monitor high fee transactions
const highFeeTrigger: CreateTriggerRequest = {
name: "High Fee Monitor",
chain: "bitcoin",
network: "mainnet",
type: "transaction",
webhook_url: "https://your-app.com/webhook/high-fee",
filters: [{
key: "fee",
operator: ">",
value: "100000" // 0.001 BTC in satoshis
}],
confirmations: 2
};
// Using the helper function for wallet monitoring
const walletAddress = "bc1qxy2kgdygjrsqtzq2n0yrf2493p83kkfjhx0wlh";
const balanceMonitor = createWalletBalanceMonitoringTrigger(
walletAddress,
"mainnet",
"https://your-app.com/webhook/balance",
1 // confirmations
);
const createdTrigger = await eventManager.createTrigger(balanceMonitor);
```
## Security Considerations
**Important Security Notes:**
1. **Use Maestro Dashboard**: Manage all triggers through the secure [Maestro Dashboard](https://docs.gomaestro.org/event-manager#set-up-an-event-manager) instead of building custom admin interfaces
2. **Webhook Validation**: Verify webhook authenticity using signatures
3. **Rate Limiting**: Consider implementing rate limiting on webhook endpoints
## Common Use Cases
### 1. Wallet Monitoring
* Track activity on specific wallet addresses
* Get notified when funds are received or sent
* Monitor for suspicious activity patterns
### 2. Large Transaction Alerts
* Alert when transactions exceed certain thresholds
* Monitor for whale movements
* Compliance and AML monitoring
### 3. Rune/Inscription Activity
* Track new rune mints or transfers
* Monitor inscription marketplace activity
* Get notified of rare asset movements
### 4. Portfolio Automation
* Automatically update portfolio values
* Trigger rebalancing based on events
* Generate activity reports
See our example [Wallet Insights Demo](https://replit.com/@roethke/Maestro-Replit-Templates?v=1) for a working implementation of wallet monitoring and event management operating together in a single application.
## Best Practices
1. **Test Webhooks**: Use tools like [webhook.site](https://webhook.site/) or [ngrok](https://ngrok.com/) for local webhook testing
2. **Document Triggers**: Keep clear documentation of what each trigger does
3. **Regular Cleanup**: Remove unused triggers to avoid unnecessary API calls and remain below your account's trigger limits
## 🎉 You’re Done!
The Maestro Event Manager transforms your application from reactive to proactive by providing real-time blockchain monitoring capabilities. By implementing the admin-only architecture shown in this guide, you can:
* **Monitor critical wallet activities** without constant manual checking
* **Respond instantly** to important blockchain events
* **Automate business logic** based on on-chain activities
* **Maintain security** by keeping event management admin-only
The integration with your existing wallet demo creates a powerful combination of portfolio visualization and automated monitoring, making your application more responsive and valuable to users.
For more advanced features, explore the full [Event Manager API documentation](https://docs.gomaestro.org/bitcoin/event-manager-api/overview) and consider implementing custom trigger conditions for your specific use case.
Be sure to review Maestro's rate limits, **trigger limits** and [pricing tiers](https://gomaestro.org/pricing) to select the plan that best fits your application's needs.
**Support**
If you are experiencing any trouble with the above, [open an issue](https://github.com/maestro-org/maestro-replit-templates/issues/new) or reach out on Discord.
6. **Click "Create"** to activate monitoring
#### Step 3: Test Your Webhook
1. **Send a test transaction** that matches your trigger conditions
2. **Monitor the Event Logs** to see triggered events in real-time
3. **Check your webhook endpoint** to verify you're receiving notifications
4. **Review the payload structure** to understand the data format for your application
#### Step 4: Manage Active Webhooks
1. **View all webhooks** in the dashboard with status indicators (Active/Paused)
2. **Monitor webhook statistics** including event count and last triggered time
3. **Pause/Resume webhooks** as needed for maintenance or testing
4. **Edit webhook settings** to modify filters, webhook URLs, or confirmation requirements
5. **Delete unused webhooks** to stay within your account limits and keep things organized
#### Step 5: Monitor Event Logs
1. **Filter logs** by trigger, date range, or status for easier debugging
2. **Inspect event details** including the full transaction payload and webhook response
3. **Troubleshoot webhook issues** by checking response status codes and error messages
4. **Export logs** for analysis or compliance reporting if needed
*If you'd prefer to manage webhooks/logs programmatically, the [Event Manager API](https://docs.gomaestro.org/bitcoin/event-manager-api/overview) provides comprehensive functionality for this. Available operations shown below.*
**Pro Tips for Dashboard Usage:**
* Start with testnet webhooks to familiarize yourself with the interface
* Use descriptive trigger names that indicate their purpose
* Set up multiple webhooks with different confirmation levels for different use cases
* Regularly review and clean up unused webhooks to optimize performance
### Trigger Management
The following snippets are borrowed from the [Bitcoin Wallet Insight Demo](https://github.com/maestro-org/maestro-replit-templates/tree/main/maestro-wallet-demo).
#### 1. Creating Triggers
Create triggers to monitor Bitcoin transactions based on specific conditions:
```typescript theme={null}
const eventManager = new EventManagerApi('mainnet', 'your-api-key');
const triggerConfig: CreateTriggerRequest = {
name: "High Value Transaction Monitor",
chain: "bitcoin",
network: "mainnet",
type: "transaction",
webhook_url: "https://your-app.com/webhook",
filters: [
{
key: "total_input_volume",
operator: ">",
value: "1000000000" // 10 BTC in satoshis
}
],
confirmations: 6
};
const newTrigger = await eventManager.createTrigger(triggerConfig);
console.log('Created trigger:', newTrigger.id);
```
#### 2. Listing All Triggers
Retrieve all your active triggers:
```typescript theme={null}
const triggers = await eventManager.listTriggers();
triggers.forEach(trigger => {
console.log(`${trigger.name} (${trigger.id}): ${trigger.status}`);
console.log(`Events triggered: ${trigger.event_count}`);
});
```
#### 3. Getting Trigger Details
Fetch detailed information about a specific trigger:
```typescript theme={null}
const triggerId = "your-trigger-id";
const trigger = await eventManager.getTrigger(triggerId);
console.log('Trigger details:', trigger);
```
#### 4. Updating Triggers
Modify existing triggers (name, filters, status, etc.):
```typescript theme={null}
const updates: UpdateTriggerRequest = {
name: "Updated High Value Monitor",
chain: "bitcoin",
network: "mainnet",
type: "transaction",
webhook_url: "https://your-app.com/webhook",
status: "paused", // or "active"
filters: [
{
key: "total_input_volume",
operator: ">",
value: "2000000000" // 20 BTC in satoshis
}
],
confirmations: 6
};
const updatedTrigger = await eventManager.updateTrigger(triggerId, updates);
console.log('Updated trigger:', updatedTrigger);
```
#### 5. Deleting Triggers
Remove triggers that are no longer needed:
```typescript theme={null}
await eventManager.deleteTrigger(triggerId);
console.log('Trigger deleted successfully');
```
### Filter Options
Available filter keys include:
* **sender**: Monitor transactions from specific addresses (operator: `=`)
* **receiver**: Monitor transactions to specific addresses (operator: `=`)
* **sender\_or\_receiver**: Monitor transactions involving specific addresses (operator: `=`)
* **transaction\_id**: Monitor specific transaction IDs (operator: `=`)
* **total\_input\_volume**: Monitor by transaction value (operators: `=`, `>`, `>=`, `<`, `<=`)
* **fee**: Monitor by transaction fee (operators: `=`, `>`, `>=`, `<`, `<=`)
* **size**: Monitor by transaction size in bytes (operators: `=`, `>`, `>=`, `<`, `<=`)
* **weight**: Monitor by transaction weight (operators: `=`, `>`, `>=`, `<`, `<=`)
### Event Log Management
#### 6. Listing Event Logs
View logs of triggered events with optional filtering:
```typescript theme={null}
// List all logs with pagination
const logs = await eventManager.listEventLogs({
page: 1,
limit: 50
});
// Filter logs by trigger
const triggerLogs = await eventManager.listEventLogs({
trigger_id: "your-trigger-id",
page: 1,
limit: 20
});
// Filter by chain and network
const mainnetLogs = await eventManager.listEventLogs({
chain: "bitcoin",
network: "mainnet",
page: 1,
limit: 25
});
logs.forEach(log => {
console.log(`Log ${log.id}: Status ${log.status}`);
console.log(`Response: ${log.response_status} - ${log.response}`);
});
```
#### 7. Getting Specific Event Logs
Retrieve detailed information about a specific event log:
```typescript theme={null}
const logId = "your-log-id";
const eventLog = await eventManager.getEventLog(logId);
console.log('Event log details:', {
id: eventLog.id,
trigger_id: eventLog.trigger_id,
status: eventLog.status,
response_status: eventLog.response_status,
payload: eventLog.payload
});
```
### Advanced Filter Examples
Here are practical examples of different filter configurations:
```typescript theme={null}
// Monitor large transactions (>= 1 BTC)
const largeTransactionTrigger: CreateTriggerRequest = {
name: "Large Transaction Monitor",
chain: "bitcoin",
network: "mainnet",
type: "transaction",
webhook_url: "https://your-app.com/webhook/large-tx",
filters: [{
key: "total_input_volume",
operator: ">=",
value: "100000000" // 1 BTC in satoshis
}],
confirmations: 3
};
// Monitor specific wallet address
const walletMonitor: CreateTriggerRequest = {
name: "Wallet Activity Monitor",
chain: "bitcoin",
network: "mainnet",
type: "transaction",
webhook_url: "https://your-app.com/webhook/wallet",
filters: [{
key: "sender_or_receiver",
operator: "=",
value: "bc1qxy2kgdygjrsqtzq2n0yrf2493p83kkfjhx0wlh"
}],
confirmations: 1
};
// Monitor high fee transactions
const highFeeTrigger: CreateTriggerRequest = {
name: "High Fee Monitor",
chain: "bitcoin",
network: "mainnet",
type: "transaction",
webhook_url: "https://your-app.com/webhook/high-fee",
filters: [{
key: "fee",
operator: ">",
value: "100000" // 0.001 BTC in satoshis
}],
confirmations: 2
};
// Using the helper function for wallet monitoring
const walletAddress = "bc1qxy2kgdygjrsqtzq2n0yrf2493p83kkfjhx0wlh";
const balanceMonitor = createWalletBalanceMonitoringTrigger(
walletAddress,
"mainnet",
"https://your-app.com/webhook/balance",
1 // confirmations
);
const createdTrigger = await eventManager.createTrigger(balanceMonitor);
```
## Security Considerations
**Important Security Notes:**
1. **Use Maestro Dashboard**: Manage all triggers through the secure [Maestro Dashboard](https://docs.gomaestro.org/event-manager#set-up-an-event-manager) instead of building custom admin interfaces
2. **Webhook Validation**: Verify webhook authenticity using signatures
3. **Rate Limiting**: Consider implementing rate limiting on webhook endpoints
## Common Use Cases
### 1. Wallet Monitoring
* Track activity on specific wallet addresses
* Get notified when funds are received or sent
* Monitor for suspicious activity patterns
### 2. Large Transaction Alerts
* Alert when transactions exceed certain thresholds
* Monitor for whale movements
* Compliance and AML monitoring
### 3. Rune/Inscription Activity
* Track new rune mints or transfers
* Monitor inscription marketplace activity
* Get notified of rare asset movements
### 4. Portfolio Automation
* Automatically update portfolio values
* Trigger rebalancing based on events
* Generate activity reports
See our example [Wallet Insights Demo](https://replit.com/@roethke/Maestro-Replit-Templates?v=1) for a working implementation of wallet monitoring and event management operating together in a single application.
## Best Practices
1. **Test Webhooks**: Use tools like [webhook.site](https://webhook.site/) or [ngrok](https://ngrok.com/) for local webhook testing
2. **Document Triggers**: Keep clear documentation of what each trigger does
3. **Regular Cleanup**: Remove unused triggers to avoid unnecessary API calls and remain below your account's trigger limits
## 🎉 You’re Done!
The Maestro Event Manager transforms your application from reactive to proactive by providing real-time blockchain monitoring capabilities. By implementing the admin-only architecture shown in this guide, you can:
* **Monitor critical wallet activities** without constant manual checking
* **Respond instantly** to important blockchain events
* **Automate business logic** based on on-chain activities
* **Maintain security** by keeping event management admin-only
The integration with your existing wallet demo creates a powerful combination of portfolio visualization and automated monitoring, making your application more responsive and valuable to users.
For more advanced features, explore the full [Event Manager API documentation](https://docs.gomaestro.org/bitcoin/event-manager-api/overview) and consider implementing custom trigger conditions for your specific use case.
Be sure to review Maestro's rate limits, **trigger limits** and [pricing tiers](https://gomaestro.org/pricing) to select the plan that best fits your application's needs.
**Support**
If you are experiencing any trouble with the above, [open an issue](https://github.com/maestro-org/maestro-replit-templates/issues/new) or reach out on Discord.